Monday, August 24, 2020
Wednesday, May 13, 2020
1:43 Flying Sportsman
Pro Car Collectibles has a new release! The Henney Packard Flying Sportsman! A concept car that was never built...until now! It was described as being completely equipped for the hunter or fisherman (or pro-car enthusiast?), it sleeps a party of four in individual bunks. The model includes fold-out awning and boat mounted to the car top. To order, choose your 2-tone color combination and click "Buy Now" to your right ------->


Tuesday, June 21, 2016
FINISHED Criterion models available
Ok, I've had a couple people ask for them...so I have decided to make available some FINISHED Criterion models. They are $54.99 + S&H. Just click the "Buy Now" button to the right or message me for an address to send a check to.


Friday, June 17, 2016
Criterion resin body kits available!
I have some unpainted resin Criterion ambulance bodies available. They come with a water-slide decal sheet and instructions. They do require a 1976 Tomica or Tomy Cadillac to use as a donor car. I am selling them for $24.99 plus S&H. See the link to the right ------->


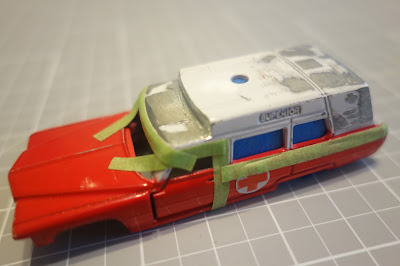
Friday, May 27, 2016
1976 Miller-Meteor Cadillac Criterion Ambulance
After many years of dreaming about it, I decided to make a model of one of my all-time favorite ambulances. The Miller-Meteor Criterion. I started off with a 1:77 scale (by my calculations it's more like 1:85 scale...) Tomica Superior Cadillac ambulance. It's a pretty neat little diecast, so I was a little sad to cut it up, but hey, you gotta break a few eggs!
I decided not to get too crazy with it, so I didn't worry about how the original model was a true commercial chassis length. And I decided to keep the original Superior rear door, because I thought it would look better than anything I tried to scribe in at that tiny scale.
First thing I did was file down all the "Superior" details. Then taped off where I would use body filler to cover the windows and add some extra height to the roof. I did this so that I wouldn't fill over details I wanted to keep, like the door handles or window trim.
After I had the body filler sanded to the shape I wanted, I marked where I would add small pieces of round styrene rod for the lights and scoop stretcher box.

After this was finished, I built the car up on a temporary clay platform for when I poured Part 1 or my two part mold.

With my two-part mold finished I was ready to cast the new resin body.


After priming and painting the car white, I taped off the areas that would be painted orange.

With the orange stripe painted on, I was ready to stick on the water-slide decals that I printed and paint the tunnel lights and rear bumper silver.


With the lights painted and the decals added, I was ready to spray on some clear coat and reassemble the body and chassis.
I decided not to get too crazy with it, so I didn't worry about how the original model was a true commercial chassis length. And I decided to keep the original Superior rear door, because I thought it would look better than anything I tried to scribe in at that tiny scale.

After I had the body filler sanded to the shape I wanted, I marked where I would add small pieces of round styrene rod for the lights and scoop stretcher box.

After this was finished, I built the car up on a temporary clay platform for when I poured Part 1 or my two part mold.

With my two-part mold finished I was ready to cast the new resin body.


After priming and painting the car white, I taped off the areas that would be painted orange.

With the orange stripe painted on, I was ready to stick on the water-slide decals that I printed and paint the tunnel lights and rear bumper silver.


With the lights painted and the decals added, I was ready to spray on some clear coat and reassemble the body and chassis.
Sunday, January 24, 2016
Final Assembled Cars
Well, they are finished! After hours and hours of assembling, dis-assembling, re-fitting, sanding, re-painting the chassis, the cars finally came together. I was very pleased with the results! Enjoy the pictures, the cars in these pictures are off to their new owners. I hope they enjoy them as much as I enjoyed building them.


Here is an older generation of Sayers & Scovill parked next to the newer:


Here is an older generation of Sayers & Scovill parked next to the newer:


Interior and final Assembly
Here are a couple pictures of a finished casket floor, complete with rollers and skid plates:


A view from the front seat, where I took out the gear shifter and put in a middle seat cushion to make a bench seat.

Now with it being time to start actually fitting everything together and assembling all the parts, I laid everything out:

Notice the handmade commercial glass windshields and partitions with glass. =)
I glued in the decorative panels, then the windows, then the interior door panels and finally the drapes over that.


Subscribe to:
Posts (Atom)